Split or divide the post into several pages on blogger
Hello blogger friends, it's been a long time since I posted a post on this blog, this time I will make a tutorial on how to split posts or divide posts into several pages on blogger. Of the most tutorials that I have found, most of them use jquery and it slows down the load on the website, especially in the template that I created there is no jquery and of course you have to add the jquery script.
And another advantage of this script that I made, it almost resembles wordpress in its split post, which is loading a page when pressing the page number button.
Please see the following demo:
Okay, go straight to the steps of how to split or divide the post into several pages on blogger, here are the steps:
1. Again, I remind you to first backup your default template, here is a tutorial on how to backup blogger templates:
Easy ways to backup blogger templates or blogspot
2 Then you edit your blogger template, if you don't know how to edit a blogger template, here's how to edit a blogger template:
How to edit a blogger or blogspot template
3. Please enter the following code:
It's up to you in the header or footer of your template, if you want to put it in the footer, you can put it </body>and if you use the seofastblogger template or the blogger template from gianmr.com you can put the code after the code </script>at the bottom.
See the picture below:

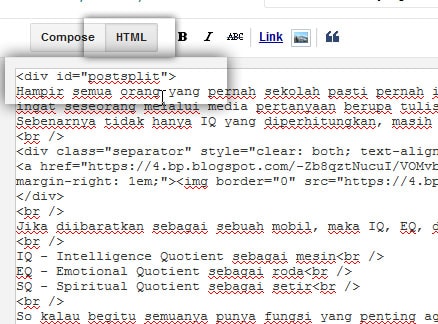
4. The stage of entering the code in your template is complete. The next step is to divide your post into sections. Please edit your blogger post. Then enter the HTML editor

5. Please enter the code <div id="postsplit">at the beginning of the post and enter the code </div>at the end of the posting.
6. Still in the HTML editor, please enter the code <!--nextpage-->in the article that you share, for example
This is an example of Paragraph 1
<!-Nextpage->
This is an example of Paragraph 2
<!-Nextpage->
This is an example of Paragraph 3
Ok from the example above. paragraph 1 is on page 1, paragraph 2 is on page 2, and so on.
Becomes
Or if you use an id for example <div id = "post"> or <div id = "post-body"> then you have to change it to:
Or
Another question you might ask is about the style or button style. Ok, the script above uses a class from the default seofastblogger template, if you use another template, please follow the script above.
You can change and customize it with the template that you have or use.
The conditional tags above:
This means that the script is loaded on post pages only and not on other pages, so it is not affected on other pages. And also not loaded on a mobile page if you activate the mobile feature on your blogger template.
Ok, don't forget to share this post if you find it useful. If you want to copy and paste this post and share it on your blogspot, please, but don't forget to include the source. :)
And another advantage of this script that I made, it almost resembles wordpress in its split post, which is loading a page when pressing the page number button.
Please see the following demo:
Okay, go straight to the steps of how to split or divide the post into several pages on blogger, here are the steps:
1. Again, I remind you to first backup your default template, here is a tutorial on how to backup blogger templates:
Easy ways to backup blogger templates or blogspot
2 Then you edit your blogger template, if you don't know how to edit a blogger template, here's how to edit a blogger template:
How to edit a blogger or blogspot template
3. Please enter the following code:
<b:if cond='data:blog.pageType == "item"'>
<b:if cond='data:blog.isMobile == "false"'>
<script type='text/javascript'>
//<![CDATA[
document.addEventListener('DOMContentLoaded', function() {
function checkChildren(nodes, elemId){
for(i=0;i<nodes.length;i++){
if(nodes[i].id==elemId){
return nodes[i];
}else{
return checkChildren(nodes[i].children, elemId);
}
}
}
function isNumeric(value) {
var type = typeof value;
return (type === 'number' || type === 'string') && !Number.isNaN(value - Number.parseFloat(value));
}
var nodes = document.querySelector('div.post-body').children;
var splitdong = checkChildren(nodes, 'postsplit').innerHTML;
var content = splitdong.split('<!--nextpage-->');
var url = window.location.href;
var url = url.split('?');
var no = url[1] + '&m=4';
var no = no.split('m');
var no = no[0];
var no = no.replace('&', '');
var url = url[0];
var i = 1;
if( !isNumeric(no) ){
var no = 1;
}
document.getElementById('postsplit').innerHTML = content[no-1];
if( content.length > 1 ) {
document.getElementById('postsplit').innerHTML += "<div class='gmr-pagenav gmr-clearfix' id='post-pager'><span class='page current'>Page :</span> </div>";
}
if( no>1 ){
document.getElementById('post-pager').innerHTML += "<a href='"+url+"?"+(no-1)+"' title='Previous Page'> Previous</a>";
}
content.forEach(function(item) {
if( no == i ){
document.getElementById('post-pager').innerHTML += "<span class='current'>"+i+"</span>";
} else {
document.getElementById('post-pager').innerHTML += "<a href='"+url+"?"+i+"' rel='nofollow' title='Page "+i+"'>"+i+"</a>";
}
i++;
});
if(content.length > no){
var nn = parseInt(no) + 1;
document.getElementById('post-pager').innerHTML += "<a href='"+url+"?"+nn+"' rel='nofollow' title='Next Page'>Next</a>";
}
});
//]]>
</script>
</b:if>
</b:if>It's up to you in the header or footer of your template, if you want to put it in the footer, you can put it </body>and if you use the seofastblogger template or the blogger template from gianmr.com you can put the code after the code </script>at the bottom.
See the picture below:
4. The stage of entering the code in your template is complete. The next step is to divide your post into sections. Please edit your blogger post. Then enter the HTML editor
5. Please enter the code <div id="postsplit">at the beginning of the post and enter the code </div>at the end of the posting.
6. Still in the HTML editor, please enter the code <!--nextpage-->in the article that you share, for example
This is an example of Paragraph 1
<!-Nextpage->
This is an example of Paragraph 2
<!-Nextpage->
This is an example of Paragraph 3
Ok from the example above. paragraph 1 is on page 1, paragraph 2 is on page 2, and so on.
Information above:
It is possible that the script does not work on other templates, other than templates from gianmr.com, if it doesn't work you must know first the div class in your post usually the class in your post div is <div class = "post"> if your div is that, then you have to change the following script:var nodes = document.querySelector('div.post-body').children;Becomes
var nodes = document.querySelector('div.post').children;Or if you use an id for example <div id = "post"> or <div id = "post-body"> then you have to change it to:
var nodes = document.querySelector('div#post-body').children;Or
var nodes = document.querySelector('div#post').children;Another question you might ask is about the style or button style. Ok, the script above uses a class from the default seofastblogger template, if you use another template, please follow the script above.
gmr-pagenav gmr-clearfixYou can change and customize it with the template that you have or use.
The conditional tags above:
<b:if cond='data:blog.pageType == "item"'>
<b:if cond='data:blog.isMobile == "false"'>This means that the script is loaded on post pages only and not on other pages, so it is not affected on other pages. And also not loaded on a mobile page if you activate the mobile feature on your blogger template.
Note:
The script above no longer needs to use jquery because the script above uses native javascript. If you have a better code, please comment !!Ok, don't forget to share this post if you find it useful. If you want to copy and paste this post and share it on your blogspot, please, but don't forget to include the source. :)